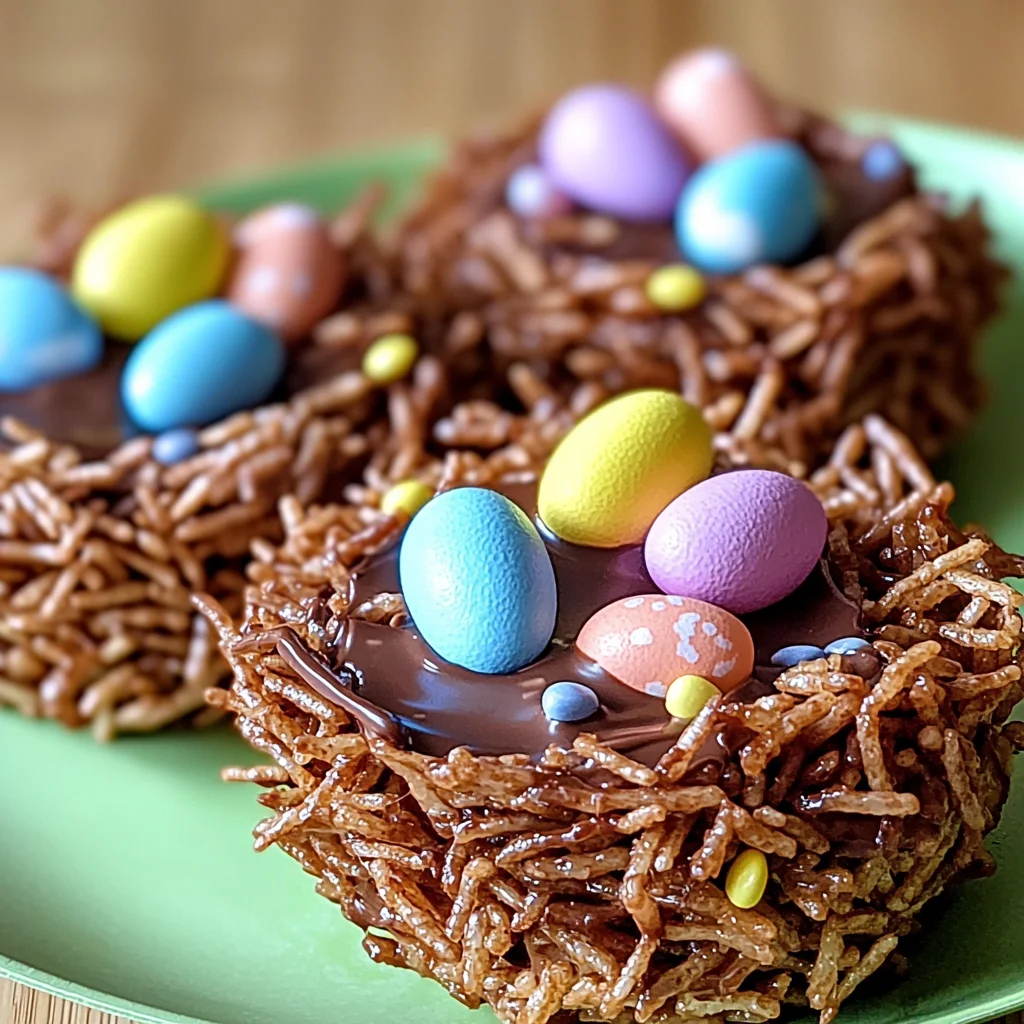
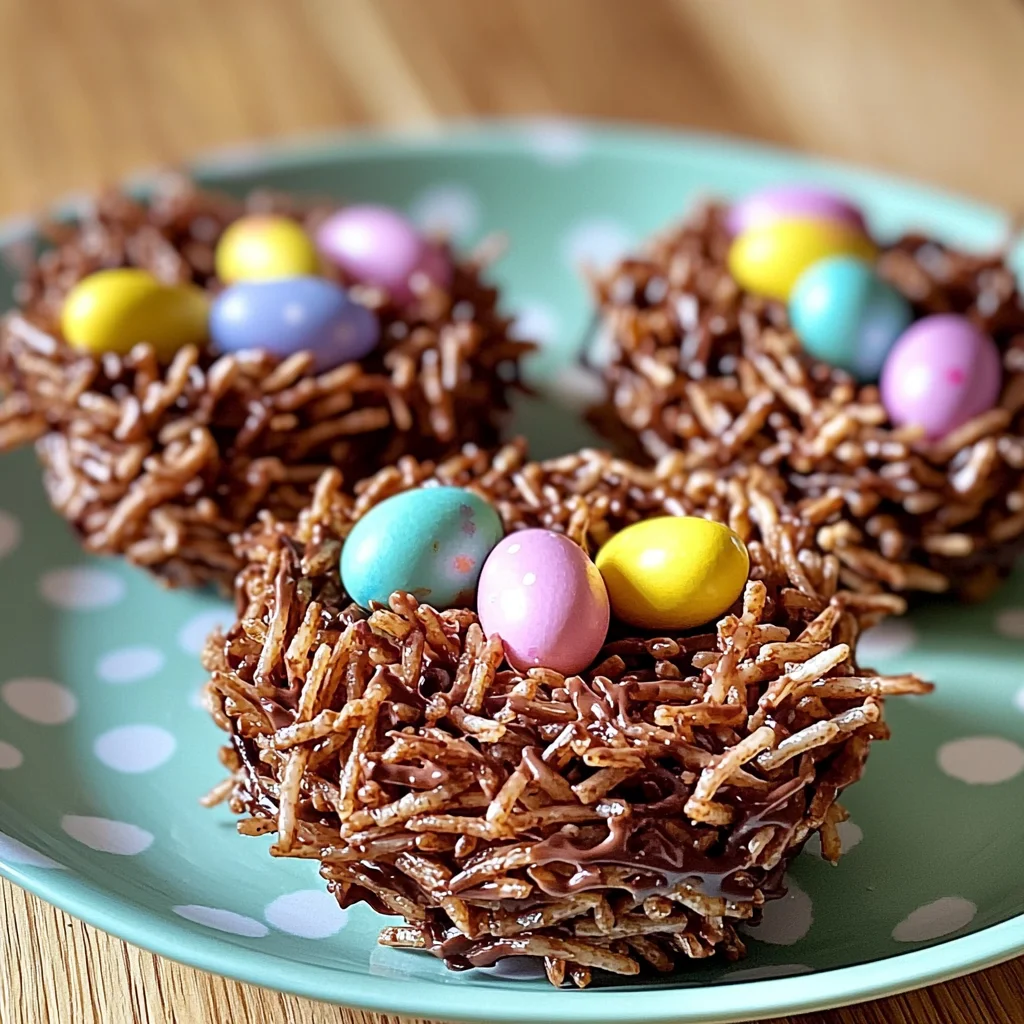
If you’re looking for a fun and festive treat to celebrate spring, these Chocolate Easter Nests are just the ticket! Every bite is a delightful combination of rich chocolate and crispy cereal, making them not only delicious but also a joy to create. This recipe is perfect for family gatherings, egg hunts, or just to bring a little cheer into your day. Plus, the best part? It’s an easy way for both kids and adults to get involved in the kitchen and make some sweet memories together.
Chocolate Easter Nests are truly special because they capture the whimsy of the season. Imagine crafting these charming little nests filled with colorful candies—how can anyone resist? Whether you’re looking to impress guests or simply indulge your sweet tooth, these treats will surely brighten up any occasion!
Why You’ll Love This Recipe
- Quick to make: With just 10 minutes of prep time, you can whip up these nests in no time!
- Family-friendly fun: Kids love getting their hands messy while shaping the nests and filling them with candies.
- Customizable treats: Personalize each nest with your favorite chocolates or toppings for added creativity.
- No-bake delight: There’s no need for an oven, making it perfect for warm days when you want something sweet without the heat.
- Great for sharing: These delightful nests are sure to impress at any gathering and make wonderful gifts as well.
Ingredients You’ll Need
These Chocolate Easter Nests use simple and wholesome ingredients that you might already have on hand! Gather these items for a fun baking adventure:
- 1 cup semi-sweet or milk chocolate chips
- 2 tablespoons butter
- 1 cup crispy rice cereal
- 1/4 cup shredded coconut (optional)
- Mini eggs or candy-coated chocolates for filling
Variations
One of the best things about these Chocolate Easter Nests is how flexible the recipe is! Feel free to get creative with different flavors and textures:
- Swap the chocolate: Use dark or white chocolate instead of milk chocolate for a different taste.
- Add some crunch: Incorporate chopped nuts or pretzels into the mixture for an extra crunch.
- Go nutty: Mix in some peanut butter before adding the cereal for a delicious nutty twist.
- Change up the fillings: Use gummy candies, dried fruits, or even fresh berries instead of mini eggs for variety.
How to Make Chocolate Easter Nests
Step 1: Melt the Chocolate
Start by melting your chocolate chips and butter together in a microwave-safe bowl. Heat them in short intervals of 30 seconds, stirring after each until smooth. This step is crucial because it ensures that your chocolate is perfectly melted and easy to mix with the other ingredients.
Step 2: Combine with Cereal
Once your chocolate mixture is nice and smooth, gently fold in the crispy rice cereal and shredded coconut if you’re using it. Make sure everything is well coated; this will create that delightful nest texture that everyone loves!
Step 3: Shape Your Nests
Spoon small amounts of your mixture onto parchment paper. Use your fingers (or a spoon) to shape them into nest-like forms with an indentation in the center. This step adds that whimsical touch that makes these treats so adorable!
Step 4: Add Your Fillings
While the nests are still warm, press mini eggs or your chosen candies into each one. This not only looks cute but also keeps your fillings secure as they set.
Step 5: Chill Until Set
Finally, refrigerate your nests for about 30 minutes until they’re firm. Once set, they’re ready to serve! Share them at your next gathering or enjoy them at home as a sweet springtime treat!
Pro Tips for Making Chocolate Easter Nests
Creating the perfect Chocolate Easter Nests can be a delightful experience, and these tips will help you achieve sweet success!
- Use quality chocolate: Opting for high-quality chocolate chips enhances the flavor and texture of your nests, making them irresistibly delicious.
- Let the mixture cool slightly: Allowing the chocolate and cereal mixture to cool a bit before shaping helps prevent burns and makes it easier to mold the nests into shape.
- Shape quickly: Work fast while forming the nests as the chocolate can set quickly. This ensures you get those charming nest shapes before it hardens.
- Experiment with fillings: Don’t hesitate to try different fillings like dried fruit or yogurt-covered candies to add a unique twist and cater to various tastes.
- Store properly: Keep your nests in an airtight container at room temperature to maintain their crispiness and freshness for up to a week.
How to Serve Chocolate Easter Nests
Presenting your Chocolate Easter Nests beautifully can make them even more enjoyable! Here are some fun serving ideas.
Garnishes
- Edible flowers: Adding small edible flowers on top of each nest gives a fresh, spring-like touch that enhances their charm.
- Chocolate drizzle: A light drizzle of melted chocolate over the nests adds an elegant finish and extra sweetness.
Side Dishes
- Fresh fruit salad: A colorful mix of seasonal fruits complements the sweetness of the nests, providing a refreshing contrast.
- Vanilla ice cream: The creamy richness of vanilla ice cream pairs perfectly with the crunchy texture of the nests, creating a delightful dessert experience.
- Yogurt parfaits: Layering yogurt with granola and fresh berries creates a balanced side dish that harmonizes well with these chocolaty treats.
Make Ahead and Storage
Chocolate Easter Nests are perfect for meal prep, allowing you to whip up a batch ahead of time for parties, gatherings, or just to have on hand as a delightful treat.
Storing Leftovers
- Store Chocolate Easter Nests in an airtight container at room temperature.
- Keep them away from direct sunlight and heat sources.
- Enjoy within one week for the best taste and texture.
Freezing
- Place the nests in a single layer on a baking sheet and freeze until solid.
- Transfer to an airtight container or freezer bag, separating layers with parchment paper.
- Freeze for up to three months; thaw at room temperature before serving.
Reheating
- There’s no need to reheat these treats; they are best enjoyed at room temperature!
- If chilled, simply let them sit out for about 10-15 minutes before indulging.
FAQs
Can I make Chocolate Easter Nests ahead of time?
Absolutely! You can prepare Chocolate Easter Nests a few days in advance. Just store them in an airtight container to keep them fresh.
What can I use instead of chocolate chips for Chocolate Easter Nests?
You can easily customize your nests by using dark or white chocolate instead of milk chocolate. Peanut butter chips are also a delicious alternative!
How long do Chocolate Easter Nests last?
When stored properly in an airtight container, Chocolate Easter Nests will last up to one week at room temperature, making them a great make-ahead treat.
Can I add other candies to my Chocolate Easter Nests?
Definitely! Feel free to get creative with your fillings. Use different mini eggs, candy-coated chocolates, or even dried fruit for added flavor and texture.
Are there any alternatives for the cereal in Chocolate Easter Nests?
Yes! While crispy rice cereal is traditional, you can substitute it with cornflakes or another crunchy cereal of your choice for a different texture and taste.
Final Thoughts
Making Chocolate Easter Nests is not only fun but also a wonderful way to celebrate the joy of spring and togetherness. I hope you enjoy creating these delightful treats as much as I do! They’re perfect for sharing with friends and family during festive occasions or simply indulging yourself. Happy cooking!
Chocolate Easter Nests

Chocolate Easter Nests are a delightful and whimsical treat perfect for celebrating the spring season. These no-bake desserts are made with rich chocolate and crispy cereal, creating a fun and crunchy texture that both kids and adults love. Ideal for family gatherings or festive occasions, these colorful nests can be filled with your favorite candies, allowing you to customize them to your liking. With just a few simple ingredients, you’ll find that making these charming treats is not only easy but also a wonderful way to create sweet memories together in the kitchen.
- Prep Time: 10 minutes
- Cook Time: 0 minutes
- Total Time: 10 minutes
- Yield: Approximately 10 nests 1x
- Category: Dessert
- Method: No-bake
- Cuisine: American
Ingredients
- 1 cup semi-sweet or milk chocolate chips
- 2 tablespoons butter
- 1 cup crispy rice cereal
- 1/4 cup shredded coconut (optional)
- Mini eggs or candy-coated chocolates for filling
Instructions
- Melt the chocolate chips and butter in a microwave-safe bowl, heating in 30-second intervals until smooth.
- Fold in the crispy rice cereal and shredded coconut (if using) until well coated.
- Spoon small amounts of the mixture onto parchment paper, shaping them into nests with an indentation in the center.
- While still warm, press mini eggs or chosen candies into each nest.
- Chill in the refrigerator for about 30 minutes until firm, then enjoy!
Nutrition
- Serving Size: 1 nest (30g)
- Calories: 150
- Sugar: 12g
- Sodium: 50mg
- Fat: 8g
- Saturated Fat: 5g
- Unsaturated Fat: 3g
- Trans Fat: 0g
- Carbohydrates: 16g
- Fiber: 1g
- Protein: 2g
- Cholesterol: 10mg